The Pro-C is compatible with the Hunter Solar Sync. Solar Sync is a sensor system that will automatically adjust the Pro-C controller’s watering run times (based on changes in local climate condition) by using the Seasonal Adjust function. The Solar Sync uses a solar and temperature sensor to determine evapotranspiration (ET), or the rate at which plants and turf use water, and also includes Hunter Rain Clik and Freeze Clik technology that will shut down irrigation when it rains and/or during freezing conditions.
The Pro-C / PCC (blue panel and blue buttons) with the SOLAR SYNC dial position is programmed with the Solar Sync technology and, therefore, does not require the use the Solar Sync module.
The older style Pro-C controllers (green buttons) require the installation of the Solar Sync module as well as the Sensor.

Connect the Green and Black wire from the Solar Sync Sensor to the “SEN” wiring terminals on the Pro-C 400 controller as shown on image to the right. It does not matter which wire connects to which terminal. Remove the metal jumper plate (if installed) from the sensor terminals prior to installing the green and black wires to the sensor terminals.
Turn the dial to the SOLAR SYNC position. The display will initially show dashed lines and then will show the default Region setting (3) on the left and the default Water Adjustment setting (5) on the right.
Adjust the Region by using the up or down arrows. Press the right arrow once, the Water Adjustment will be flashing. Adjust the Water Adjustment by using the up or down arrows.
NOTE: Solar Sync will apply a default seasonal adjust value of 100% until the first full day (24 hour period) of weather measurements have been received from the sensor.
NOTE: Enabling the Sensor Bypass switch has no effect on the seasonal adjust updates from the Solar Sync sensor. It will, however, bypass the Rain Clik and Freeze Clik functionality of the sensor. If you wish to disable the Solar Sync on the Pro-C, you will need to uninstall the Solar Sync Sensor.
NOTE: Older model Pro-C controllers (green buttons) will require the installation of the Solar Sync Module as well as the sensor.

Turn off AC power to the irrigation controller before connecting the Solar Sync module to the controller. The 7-conductor cord extends through the left side of the module and is color-coded to simplify wiring connections.
| Wire from module | Attach wire to: |
|---|---|
| Red | 24 VAC (AC terminal 1) |
| White | 24 VAC (AC terminal 2) |
| Blue | Remote terminal (REM) |
| Yellow | Sensor terminal (SEN) |
| Orange | Sensor terminal (SEN) |
| Green | Solar Sync sensor (green wire) |
| Black | Solar Sync sensor (black wire) |
The Solar Sync is simple to program. Only a few initial steps are necessary to program the module. When power is initially turned on, the display will show the time of day. Pressing the button will sequence through the programming functions on the module. An arrow along the bottom of the display will indicate the function being programmed.

Current Time
Press the button press until the arrow is displayed over the clock icon. The time of day will be flashing. Use the or button to set the current time. The arrow to the right of the display indicates AM or PM.
Note: 24 hour mode will only be enabled with a 50 Hz power input.

Controller Type
Press the button until the arrow is displayed over the controller icon. Use the or button to select the correct Hunter controller.
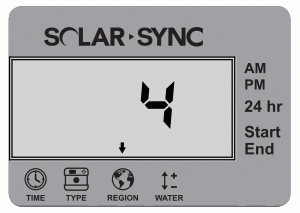
Region
For accurate measurements, the Solar Sync module needs to be programmed for the typical ET (average July ET) for your region. Press the button until the arrow is displayed over the globe icon. Use the or button to select your region (regions 1 through 4).

Watering Adjustment
If you find that your landscape is "wetter" or "drier" than it should be, a watering adjustment function is provided to adjust watering equally to all stations. Use the button until the arrow is displayed over the water icon icon. Use the or button to increase or decrease the amount of watering scaled 1 to 10 (1 for less water and 10 for more water). Hunter recommends observing performance carefully over the first weeks of operation before adjusting the watering.

NOTE: The Solar Sync module offers a “No Water Window” that prevents any irrigation from occurring during a specific period of the day. The “No Water Window” is a hidden feature on the module. Press and hold the right arrow button for 5 seconds to program the "No Water Window."
A right arrow will be flashing at the START along the right side of the display. Use the or buttons to adjust the time you would like the no watering period to start. Pressing the button again will display an arrow flashing at END. Use the or buttons to adjust the time you would like the no watering period to end.
Vous avez toujours besoin d'aide ? Nous sommes à votre disposition.
Dites-nous de quoi vous avez besoin et nous trouverons la solution qui vous convient le mieux.