Step 1. Check the controller programming
- Is there a watering Start Time programmed into the controller?
- Is the Watering Start Time programmed with correct time of day (i.e. AM or PM)?
- Is the Current Time set correctly (i.e. AM or PM)?
- Is today a Water Day? (i.e. Controller may be set for Even Days and today is the 21st)
- Is the controller set on Interval watering days?
- Are there Station Run Times programmed into the controller?
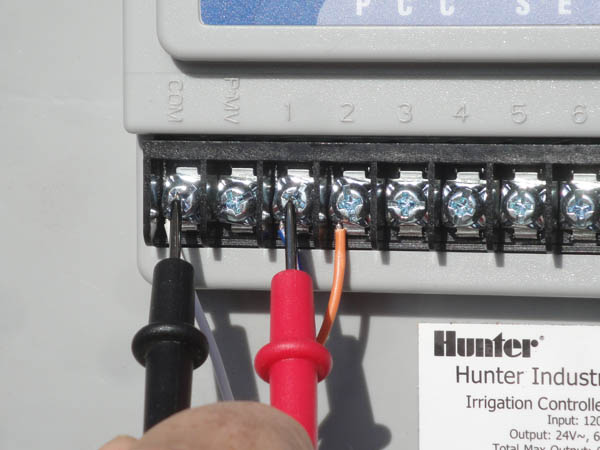
Step 2. Check the controller operation
After you have verified that the controller is programmed correctly, check to make sure the controller is operating correctly.
- Attempt to run the station manually from the controller.
- Make sure any weather sensors connected to the controller are not active or overriding at the controller.
- Test the voltage output for the station with a voltmeter (24-29 Volts AC).
Step 3. Check for Rain Sensor operation
Is there a rain sensor wired into the controller?
- Look at the “Sensor” terminals on the controller. If there are wires connected to the “Sensor” terminal screws, there is a sensor on the irrigation system.
By sliding the Rain Sensor switch to the “Bypass” position you can over-ride the active sensor. - Look at the controller display, if the “Sensor OFF” message is displayed, the sensor is activated and inhibiting the watering cycles.
By sliding the Rain Sensor switch to the “Bypass” position you can over-ride the active sensor.
Step 3. Check the water supply
Is the main irrigation water supply open?
- Go to one of the irrigation valves and turn the solenoid 1/4 to 1/2 a turn counter-clockwise. If you have a master valve, turn the solenoid on the master valve, then turn the solenoid on the zone valve.
If the valve opens and sprinklers turn on, your valve is working and you’ll need to check the controller and field wiring.
If the valve did not turn on any of the sprinklers, the water to the valves is still off. Find the irrigation isolation valve and open it.
Step 3. Check the wiring.
If your controller test confirms good voltage (24-29 Volts AC) output from the station terminal, test the voltage at the valve. If you have voltage at the controller but not at the valve, the valve wire may be cut or disconnected.
Click on image for an exploded view.
Step 4. Check the valve.
After you have verified that the controller is programmed correctly, check to make sure the controller is operating correctly.
- Make sure the valve is operating normally by turning the solenoid 1/2" turn counter-clockwise. Turning the solenoid will turn the valve on manually. Turn the solenoid clockwise until snug to turn off the valve.
- If the valve will not turn on manually, check the water supply to the valve.
- If the valve will turn on manually, test the solenoid operation. The solenoid Ohms resistance should be approximately between 25 and 35 Ohms.
Still need help? We're here.
Tell us what you need support with and we'll find the best solution for you.