There are several reasons why a valve might not open. Please review the following checklist:
Water Turned OffInsufficient VoltageClogged Solenoid Exhaust PortsStation Not Activating

It is always a good idea to make sure the water supply to your irrigation system is on. Test the system manually at the valve location.
- Turn the solenoid (the black cylinder with 2 wires) counter-clockwise a ¼" to ½" turn.
- To shut off the valve, twist the solenoid clockwise until it is snug on the valve.
NOTE: If your system has a master valve, you will need to manually open the master valve as well to see if water is turned off. Also, make sure the flow control is adjusted properly ( not all valves have this option). Learn More

If the valve does not receive an appropriate level of voltage or the wire distance is too long, you may experience issues opening the valve.
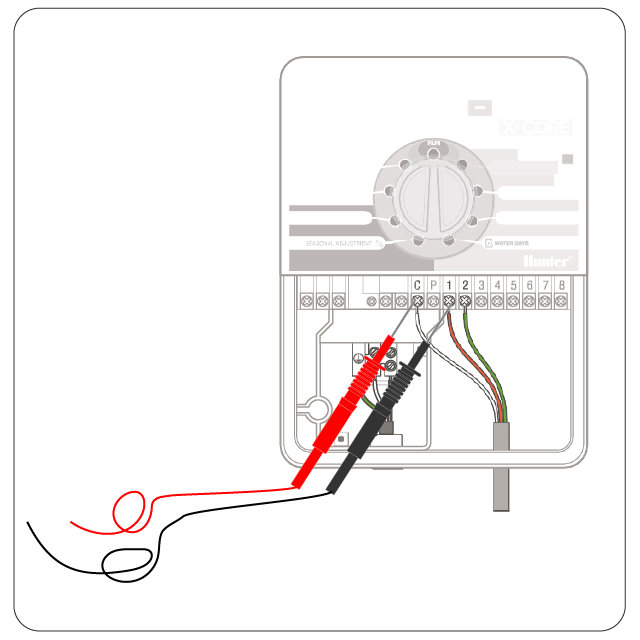
- Check the voltage at the controller screw terminals for proper voltage of 24–28 VAC. Learn more
- Using the installed wire gauge size connected to the valve, review the maximum run in the chart compared to the actual install. For additional guidance, reference the wire sizing section here.
- If there are other valves within the box, swap the valve wires to a known operating valve to verify proper voltage.
If the controller is producing the proper voltage at the wire connection of the irrigation valve, we recommend replacing the solenoid. To purchase a new solenoid, please contact Hunter's authorized network of distributors.

There is an entry port from the valve upper chamber to the solenoid and an exhaust port from the solenoid to downstream in the valve. If either port gets clogged with debris, the valve may not open or open fully.
- Attempt to turn the valve On by using the external bleed screw. If it turns on, there may be a port issue.
- Shut Off the main water supply. Opening a valve under pressure is dangerous and you could be injured.
- Remove the Screws (captive bolts) located on top of the valve bonnet.
- Remove the Bonnet (top with a solenoid), Diaphragm, Spring, and Support Ring.
- Insert a thin piece of metal or 18 AWG (0.8 mm2) station wire (small paperclip size) through the Exhaust Port. This will flush out any leftover debris (Teflon, glue, dirt, etc.).
- Reinstall the Bonnet (top with a solenoid), Diaphragm, Spring, and Support Ring.
- Activate the valve Manually from the controller to test.
- Open the manual bleed screw to see if water flows.
- If your system has a master valve, you will need to manually open the master valve as well to see if water is turned off.
- If no water flows, the irrigation water supply may be shut off.
- If water flows, open the solenoid to determine if the valve works.
- If the valve does not work, check for clogged exhaust ports.
- If the valve opens, check the solenoid voltage. Check the voltage at the controller screw terminals for proper voltage of 24–28 VAC then check the voltage at the wire splice at valve location. Learn more
- You can always try to swap wires at the controller with a known working wire to determine if the problem is the wiring or the controller.
If the controller is producing the proper voltage at the wire connection of the irrigation valve, we recommend replacing the solenoid. To purchase a new solenoid, please contact Hunter's authorized network of distributors.
If the system is NEW where the valve never worked and the valve is slip inlets, check for glue or debris inside the valve. If the valve is clean, the wire size may be the reason. Using the installed wire gauge size connected to the valve, review the maximum run in the chart compared to the actual installation. For additional guidance, reference the wire sizing section. Learn More
Still need help? We're here.
Tell us what you need support with and we'll find the best solution for you.

