The Pro-C / PCC controller (with SOLAR SYNC position on dial) is programmed with the Solar Sync technology and, therefore, does not require the use of the Solar Sync module.
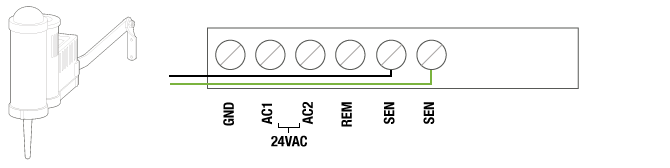
The Solar Sync Sensor (SOLARSYNCSEN or WSSSEN) is wired directly to the “SEN” terminals on the Pro-C 400 controller.
The older style Pro-C controllers (green buttons) requires the installation of the Solar Sync module as well as the Sensor.
Connect the Green and Black wire from the Solar Sync Sensor directly to the “SEN” terminals on the Pro-C 400 controller as shown on image to the right. It does not matter which wire connects to which terminal. Turn the dial to the “Solar Sync Settings” position. The display will initially show dashed lines and then will show the default Region setting (3) on the left and the default Water Adjustment setting (5) on the right.
Adjust the Region by using the up or down arrows. Press the right arrow once, the Water Adjustment will be flashing. Adjust the Water Adjustment by using the up or down arrows.
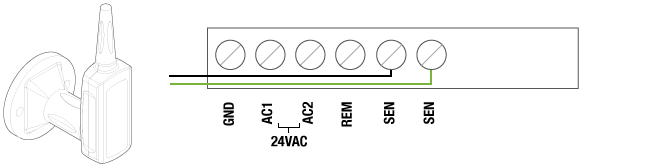
Connect the Green and Black wire from the Wireless Solar Sync Receiver directly to the “SEN” terminals on the Pro-C 400 controller as shown on image to the right. It does not matter which wire connects to which terminal. Turn the dial to the “Solar Sync Settings” position. The display will initially show dashed lines and then will show the default Region setting (3) on the left and the default Water Adjustment setting (5) on the right.
Adjust the Region by using the up or down arrows. Press the right arrow once, the Water Adjustment will be flashing. Adjust the Water Adjustment by using the up or down arrows.
The older style Pro-C controllers (green buttons) require the installation of the Solar Sync module as well as the Sensor.
Installing the Solar Sync Module
- Turn off AC power to the controller before connecting the Solar Sync module to the controller.
- Connect the red wire from the module to the AC1 terminal.
- Connect the white wire from the module to the AC2 terminal.
- Connect the blue wire from the module to the SEN terminal.
- Remove the metal jumper (if installed) from the two sensor terminals.
- Connect the yellow wire from the module to one of the SEN terminals.
- Connect the orange wire from the module to on of the SEN terminals.
- Wire the black and green wires from the module to the receiver or sensor as shown in directions above for Wired or Wireless Solar Sync Installation.
Still need help? We're here.
Tell us what you need support with and we'll find the best solution for you.