Sensores de desligamento por chuva e outros sensores devem ser configurados no menu de Dispositivos. Informamos ao controlador quais sensores estão conectados e, em alguns casos, definimos a resposta para cada sensor.
Sensores Clik
Gire o seletor até o menu de Dispositivos e selecione Sensores Clik para os sensores "Clik" básicos da Hunter.

Para configurar um sensor, clique na opção Ativar sensor Clik.
As entradas de sensores do ACC2 já vêm configuradas como Normalmente fechada, mas podem ser alteradas para Normalmente aberto para outros tipos de sensores de fechamento por contato.
Também é possível inserir um nome para sensores individuais.
A localização do sensor pode ser alterada do Controlador (correspondente aos terminais na placa de alimentação) para qualquer módulo de saída do decodificador, se o sensor estiver conectado a um decodificador de sensor ICD-SEN. Escolha o módulo de saída do decodificador ao qual ele será conectado e selecione o endereço e a porta do decodificador do sensor.
Resposta do Sensor
Localizada no menu de Dispositivos, a opção de Resposta do sensor define quais sensores desligam quais programas nas operações básicas.
As respostas do sensor são configuradas para cada programa, em uma página de cada vez. Caso você queira definir as mesmas respostas para vários programas, configure as respostas para o primeiro programa e clique na tecla Copiar. Em seguida, você pode alterar o número do programa e clicar na tecla Colar para usar as mesmas configurações.

Há três entradas padrão para o sensor Clik na placa de alimentação. Se um sensor Hunter Solar Sync estiver configurado, também haverá ajustes para chuva e baixa temperatura.
Ignorar: significa que o programa não responde ao sensor.
Suspender (recomendado): significa que o programa suspende a irrigação quando o sensor está ativo (com alarme), mas controla o tempo. Se o sensor voltar ao normal, o programa suspenso retomará a irrigação no ponto em que ela deveria estar de acordo com a programação. Assim, o programa terminará no momento originalmente definido na programação.
Pausa (tenha cuidado): significa que o programa para onde está quando o sensor está ativo. Se o sensor voltar ao normal, o programa retomará a rega de onde parou, fazendo com que o programa termine mais tarde do que o programado originalmente.
Não é possível configurar um programa com as opções Pausa e Suspenso para diversos sensores, pois as duas não podem estar ativas ao mesmo tempo. Se alterar a configuração de resposta de um sensor e outro sensor do mesmo programa for alterado automaticamente, isso é normal.

Atraso de rega: no menu Resposta do sensor, pressione a tecla de função de Atraso de rega. Esse ajuste opcional faz com que a rega fique inativa por um determinado número de dias após o término da ativação do sensor. Selecione o número de dias de inatividade da rega para cada entrada de sensor Clik.
Solar Sync
Após conectar um sensor Solar Sync ao controlador, configure sua operação no menu de Dispositivos, Solar Sync.
- Para ativá-lo, marque a opção Ativar Solar Sync.
- Escolha a Região e o Ajuste de Vazão de acordo com as instruções do manual do Solar Sync.
- Para operações normais, apenas esses ajustes são suficientes. O Solar Sync precisará de dois ou três dias para registrar dados climáticos suficientes para iniciar o ajuste.

O Atraso do Solar Sync permite que a execução do ajuste automático do Solar Sync seja adiada em alguns dias (por exemplo, até que uma nova paisagem se estabeleça). Insira o número de dias para o adiamento (1 a 250) e especifique o percentual de Ajuste Durante o Intervalo para ser usado durante esse período de atraso. Ao final desse período, o Solar Sync começará a realizar o ajuste automático de acordo com as condições climáticas do momento.
O atraso não interfere nas funções de chuva e temperatura do Solar Sync. Funcionará durante o atraso.
Para concluir a configuração, acesse o menu de Programa, Ajuste Sazonal e defina programas que irão utilizar o Solar Sync.
Sensores de Vazão
Para conectar um ou mais sensores de vazão, configure a operação no menu Dispositivos, Sensores de vazão.
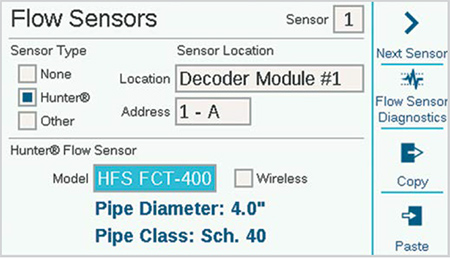
Selecione o número da entrada do sensor a ser configurado (1 a 6). O controlador conta com três entradas integradas de sensor de vazão. Além disso, é possível adicionar mais três com o módulo de expansão de vazão A2C-F3.
As versões do decodificador ACC2 também podem ler a vazão por meio do circuito de dois fios quando os sensores de vazão estão conectados aos decodificadores de sensores ICD-SEN. Use a janela Localização para selecionar o Controlador (correspondente a um dos terminais de vazão na placa de alimentação ou nos módulos de expansão de vazão A2C-F3) ou para selecionar o módulo de saída do decodificador ao qual o sensor de vazão será conectado.
Especifique o endereço do decodificador do sensor para o sensor de vazão. Sensores de vazão só podem ser conectados à porta "A" de um decodificador de sensor.
Marque a caixa de seleção de medidores de vazão da "Hunter" ou "Outros".
Se a opção Hunter for selecionada, vá para o campo Modelo e selecione o número do modelo FCT da Hunter para o diâmetro da tubulação. Esses passos são suficientes para a calibração.
"Sem fio" somente é marcado para uso com o WFS (sensor de vazão sem fio) da Hunter, que exige um receptor instalado no controlador.
Se a opção Outros for marcada, você deve selecionar o Estilo do Sensor de Vazão e inserir as informações de calibração. Determinados sensores utilizam o Fator K e Compensação, outros são do tipo Pulso. Para a configuração correta, consulte a documentação do fornecedor do medidor de vazão ou entre em contato com o suporte técnico da Hunter para obter mais informações.
Fator K e compensação: consulte esses valores no manual do sensor de vazão e insira-os aqui.
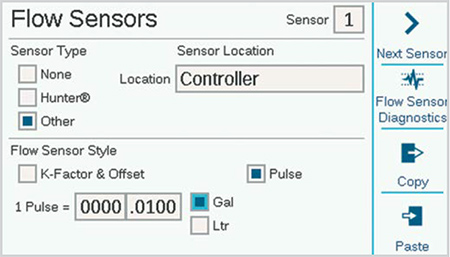
Tipo de pulso: insira o valor igual a um único pulso.
Insira os dados para cada sensor de vazão conectado a um terminal de vazão. Se todos os medidores forem do mesmo tipo e tamanho, você pode utilizar as teclas para copiar e colar.
Após inserir os dados para cada entrada do sensor de vazão, o controlador estará pronto para fazer a leitura da vazão. Contudo, para permitir o monitoramento em tempo real, cada sensor de vazão deve ser vinculado a um Setor de Vazão (Vazão, Setores de Vazão).
O Total de Vazão pode ser visto no menu de Vazão.
As taxas de vazão atuais (dadas pelo sensor) podem ser vistas na tela de Início/Atividades por meio da tecla Veja a Vazão.
Monitoramento de vazão: é necessário realizar uma configuração adicional no nível de setor no menu de Vazão (setores de vazão) e no menu de Setores, Configuração do setor.
Ainda precisa de ajuda? Conte conosco.
Conte-nos que tipo de ajuda você precisa para encontrarmos a melhor solução para você.